
A new Windows PC won’t automatically become a full copy of your old one. To migrate Windows to a new computer, you can transfer files and personalization settings, but installed apps and saved sign-in details need separate setup. OneDrive files aren’t included in the PC-to-PC transfer. Knowing what moves and what doesn’t helps you avoid surprises.
It’s natural to expect your documents, email, bookmarks, and familiar apps to be ready on the new computer. Windows can bring over files and settings such as your wallpaper and themes, but apps may need to be installed again. Browser data and email may also require separate steps, depending on how you use them.
This guide explains how to prepare both PCs, choose a transfer method, and move your files and settings. You’ll also learn what to set up separately, including apps, email, bookmarks, and sign-in details, and how to confirm your important data is accessible on the new computer.
Key Takeaways
- Separate files and personalization settings from apps and sign-in details, which may need to be set up again.
- Choose a transfer method that fits your account type, available backup, and the amount of data to move.
- Plan separate steps for email, contacts, calendar data, and browser bookmarks so they’re ready on the new PC.
- Check that your selected files fit the new computer’s available storage before starting a transfer.
- After moving Windows, address any driver issues and install chipset drivers from the hardware manufacturer.
Installing apps and transferring browser bookmarks
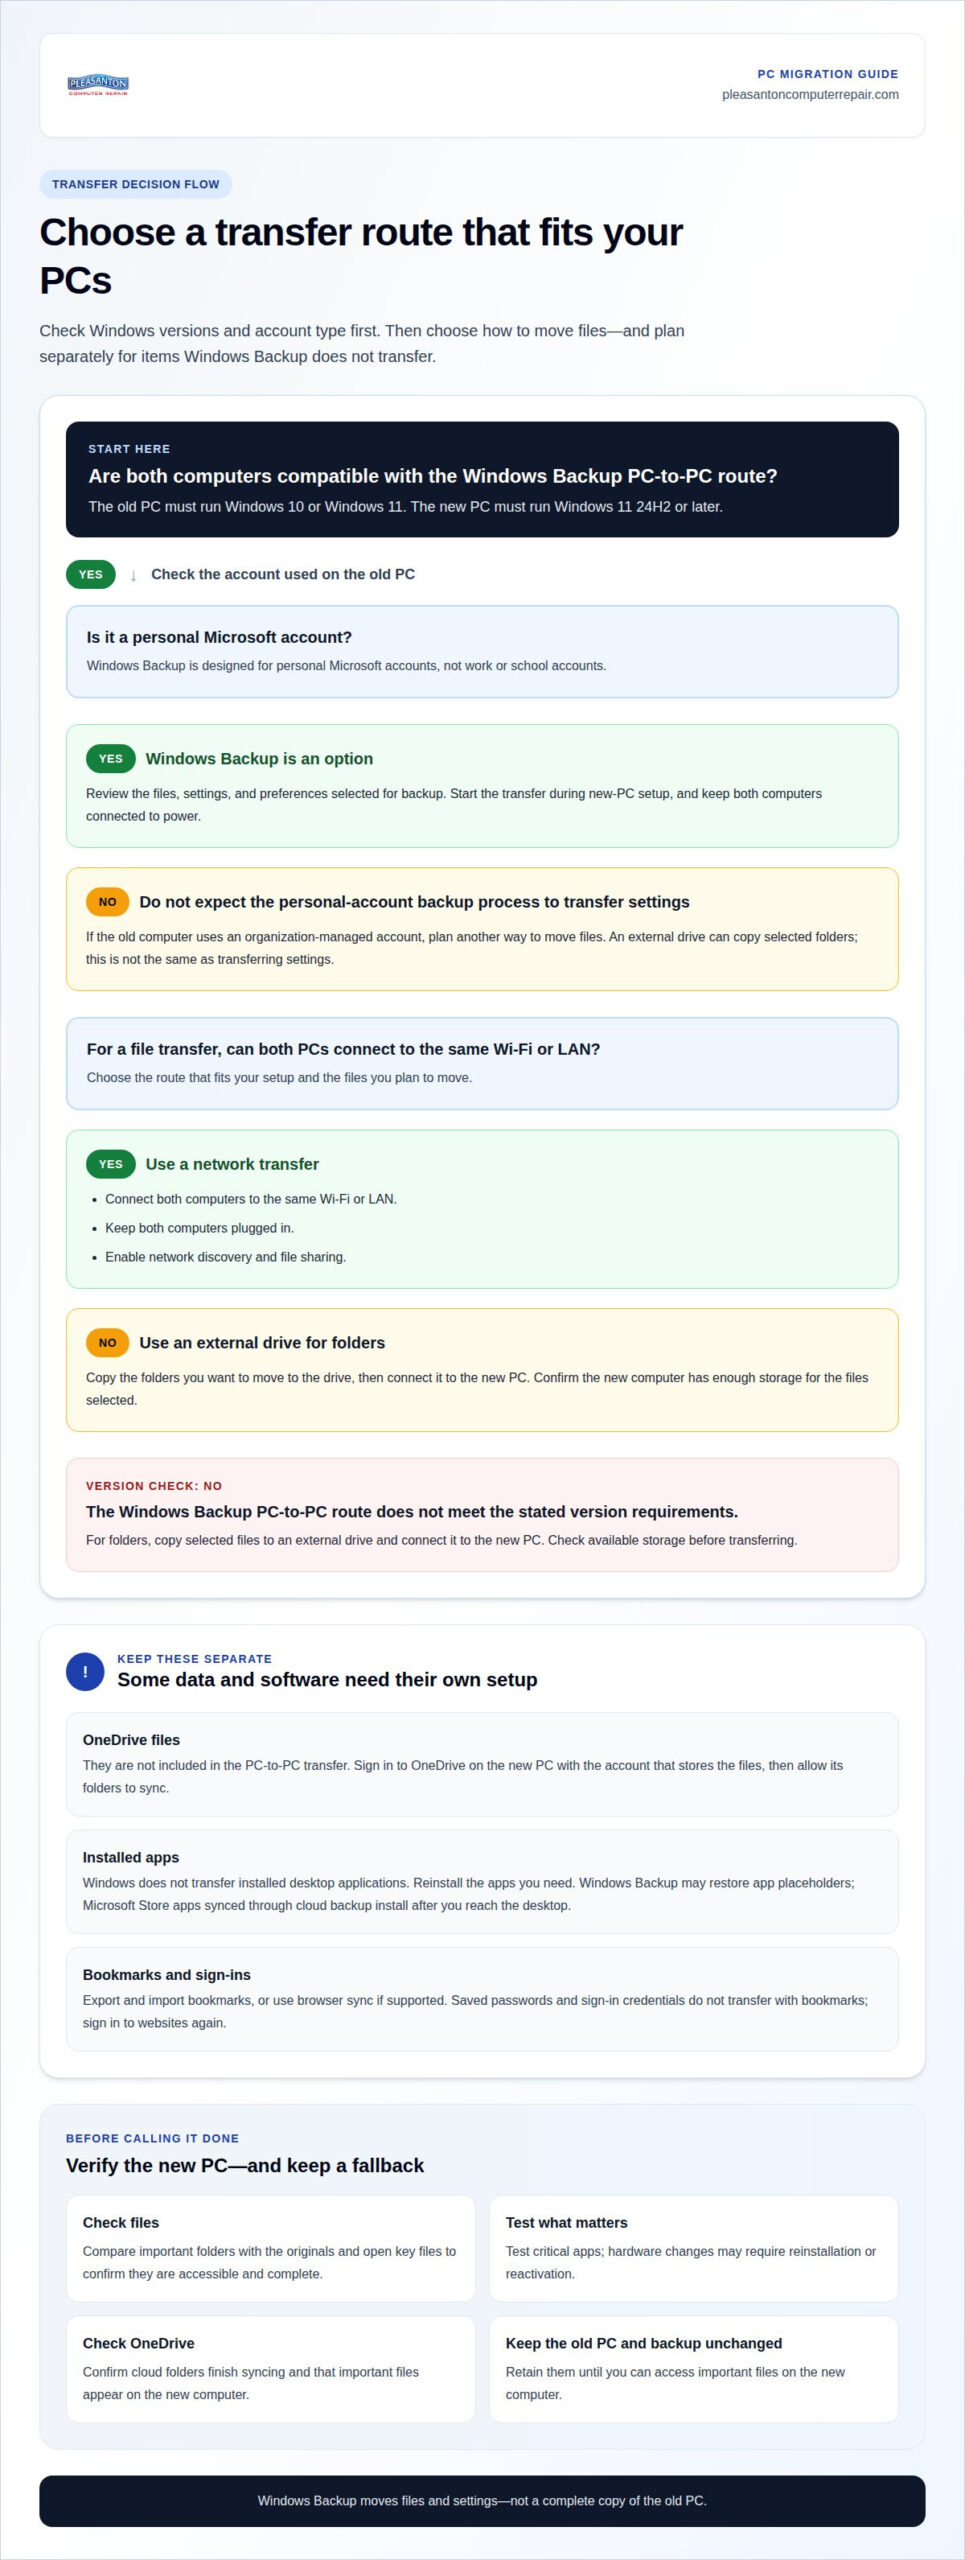
For most users, Windows Backup is the easiest way to move files and settings during new-PC setup. Cloning can carry drivers and settings configured for the old hardware, which may cause driver, startup, or activation problems.
- Prepare both computers and a backup. Update the old PC with the latest cumulative Windows 10 or Windows 11 updates, then create a complete system image before transferring Windows 11 to different hardware. Confirm the new computer has enough storage for the files you plan to move. Make sure you can access the files on the source drive before transferring them.
- Choose a transfer route. Windows Backup can transfer files, settings, and preferences from an old Windows 10 or Windows 11 PC, but the new PC must run Windows 11 24H2 or later. Start the transfer during new-PC setup. For a network transfer, connect both computers to the same Wi-Fi or LAN, keep them plugged in, and enable network discovery and file sharing. Alternatively, copy folders to an external drive, then connect it to the new PC. OneDrive files aren’t included in the PC-to-PC transfer.
-
Install Apps on the New PC
Reinstall the apps you need on the new computer. Windows doesn’t transfer installed desktop applications. Windows Backup may restore app placeholders, while Microsoft Store apps synced through cloud backup install after you reach the desktop. If you have a long app list, use Winget to export installed packages from the old PC and import the list on the new one. Test critical apps, since hardware changes may require reinstallation or reactivation.
-
Transfer Browser Bookmarks
Use your browser’s bookmark export and import tools, or sign in and enable sync if the browser supports it. For example, export bookmarks from the old browser to a file, move it using an external drive, and import it on the new PC. Don’t assume saved passwords or sign-in credentials will move with bookmarks: Windows doesn’t transfer them. Sign in to websites again and confirm your key bookmarks open correctly.
- Review the result and secure the setup. Compare important folders with the originals and open key files to check that you can access them and that they’re complete. Install trusted apps, sign in where needed, and leave behind unwanted software and years of unused programs. Windows excludes system and operating-system folders, including Program Files, Program Data, and Temp. Once you’ve confirmed your files are usable, set a regular backup routine for the new PC.
Testing critical applications remains important because hardware changes may require reactivation or reinstallation. Starting fresh can also avoid carrying unwanted software from the previous 3 years.
Microsoft account and cloud-backup requirements
Windows Backup can restore files, settings, and preferences, but the account and Windows version determine whether the transfer works. Plan separately for OneDrive syncing, which isn’t part of the PC-to-PC transfer.
-
Check Windows Version and Account Requirements
Confirm the old PC runs Windows 10 or Windows 11, and the new PC runs Windows 11 24H2 or later. Windows Backup is designed for personal Microsoft accounts, not work or school accounts. If the old computer uses an organization-managed account, don’t expect this personal-account backup process to transfer its settings. Choose a suitable personal Microsoft account before beginning setup.
-
Set Up Windows Backup and OneDrive
On the old PC, open Windows Backup and review the files, settings, and preferences selected for backup. Confirm the backup is complete before starting setup on the new computer. OneDrive files aren’t included in the PC-to-PC transfer, so handle them separately: sign in to OneDrive on the new PC with the account that stores those files, then allow its folders to sync.
- Start the transfer during new-PC setup. On the old computer, select Transfer to a new PC in Windows Backup. Enter the old-computer name shown on the new PC, then use the pairing code Windows provides to confirm the connection. Keep both computers connected to power during the transfer. If Windows Backup restores app placeholders, remember that the apps themselves aren’t installed automatically.
- Restore cloud-backed preferences selectively. Sign in to the same personal Microsoft account on the new PC and review the backup choices before restoring them. Windows cloud backup can sync installed Microsoft Store apps, but they install only after you reach the desktop. To stop remembered apps or preferences from being backed up, open Settings, choose Accounts, then Windows backup, and turn off the relevant options.
- Plan for Windows activation separately. A Windows 11 license can be activated on only one computer at a time, so it can’t remain active on both PCs simultaneously. Keep that limit in mind when moving to the new device. Windows Backup transfers personal files and settings; it doesn’t make the two computers share one active license.
- Review what arrived. After reaching the new desktop, open several restored folders and confirm OneDrive files finish syncing. Check that your personal preferences appear as expected and that Store apps install. Keep the old PC and its backup unchanged until you can access important files on the new computer. This gives you a fallback if a backup item or cloud folder hasn’t appeared yet.
Moving email, contacts, and calendar data
- Identify where each account stores its data. Before moving anything, open the email program on the old device and note each account, mailbox, contact list, and calendar. A web-based account may show its server-stored information after you sign in on the new computer. Locally stored messages or address books need a separate export and import. Knowing the difference helps you avoid assuming every item will appear automatically.
- Set up email accounts on the new computer. Install or open the email program you plan to use, then add each account with its sign-in details. For example, add work and personal mailboxes separately if they use different accounts. Let the program sync, then check folders beyond the inbox, such as sent mail and archived messages. If a folder is missing, its contents may have been stored only on the old device.
- Export locally stored messages before retiring the old PC. If messages exist only on that computer, use the old email program’s export or backup feature. Save the resulting archive to an external drive or another safe location, then use the new program’s import option. Keep the original archive until you can open sample messages and attachments on the new device. USMTGUI transfers settings and associated data such as emails, but it doesn’t transfer applications.
- Move contacts as a separate data set. In the old contacts application, look for an export option and save the address book in a format the new application can import. Add the relevant account to the new computer, then import the contact file if those contacts don’t sync through the account. Review several entries, including names and email addresses, and watch for duplicates if both account sync and file import add the same people.
- Restore calendars and confirm the result. Check whether each calendar belongs to an online account or exists only in the old email program. Sign in to the same account on the new computer and allow its calendar to sync. Export and import local calendars separately. Compare visible events across different dates, including recurring appointments, before relying on the new device. Keep the old computer or exported files available until you can access your email, contacts, and calendar entries.
For a broader move between Windows PCs, an external drive is often easier when transferring a large amount of data. A specialized USB 3.0 transfer cable is another option, with data transfer speeds of up to 5Gbps.
Third-party migration software
Disk cloning copies an old computer’s Windows installation as an image, then restores it to the new PC. Hardware differences can cause driver problems, so transferring files and settings may be a simpler option.
- Decide whether you need a clone or selected data. Use third-party migration software when you need to move more than personal folders. A clone aims to reproduce the old Windows installation; a file transfer moves selected data without carrying the whole setup. List your essential apps and files first to decide whether restoring the complete system is useful or unnecessary.
-
Choose Third-Party Migration Software
Before starting, compare the software’s stated transfer scope with what you need. For example, USMTGUI transfers settings and associated data such as emails, but doesn’t transfer applications. Plan to reinstall apps separately. If the new PC has less storage than the old one, deselect files or folders until the selection fits. Don’t begin until you know which data the tool will move.
-
Clone Windows to the New Computer
Create an image of the old PC, then restore it to the new computer using a cloning or imaging process. This can bring the Windows installation along, but the computers may use different hardware. Exported drivers can help resolve issues after restoration. Keep a separate copy of important files so a problem with the cloned installation doesn’t leave those files accessible only on the old disk.
- Plan for hardware differences before restoring. The cloned Windows installation was configured for the old PC’s components. After moving it, check that the new computer starts correctly and its devices work. Hardware-specific software can cause driver problems. Restoring an image and using exported drivers is one way to address these issues, but you may still need to troubleshoot after the transfer.
- Consider a virtual machine for a specialized migration. Another suggested approach is to back up the new laptop, create a virtual machine of the old laptop on an external device, then restore that virtual machine to the physical computer. This is more involved than copying files. Treat it as a specialized option, not a default shortcut, and keep the original backup while confirming the restored system works.
- Check the result before relying on the new PC. Open essential files, launch critical applications, and confirm the new computer can access the data you selected. If you transferred a disk image, address driver issues and reinstall applications that didn’t move. If the new PC has less available storage, review the transfer selection and remove nonessential folders until it fits.
Driver updates after migration
After you migrate Windows to a new computer, update its chipset drivers from the new PC’s hardware manufacturer. A cloned installation may include drivers configured for the old computer, so test the new system’s key components.
- Identify the new PC’s hardware before installing drivers. Note its manufacturer and model from the device label or system information. Use those details to find the correct support materials from the hardware manufacturer. Driver packages are specific to components and models, so don’t install files intended for the old computer just because they worked there. A laptop and desktop may need different packages, even when both run Windows.
- Install the chipset drivers for the new computer. Get the chipset drivers from the new PC’s hardware manufacturer and install them after transferring Windows. These drivers help Windows communicate with the system’s chipset, which connects key hardware components. Don’t rely only on drivers copied from an image of the old PC. Restart if the installer requests it, then confirm Windows starts normally.
- Review device status after the update. Open Device Manager and look for devices marked with a warning icon or listed as unknown. Check components you rely on, such as the network adapter, display, audio, and touchpad. A missing or incorrect driver can affect how a component works. Note the device name and model before choosing a replacement driver so you can match it to the new hardware.
- Use exported drivers to troubleshoot an imaged system. If you migrate Windows to a new computer using an image of the old PC, exported drivers can help resolve compatibility issues. Match each driver to the new PC’s hardware instead of installing every exported file. An old graphics or network driver may not suit a different component. If a device still fails after an update, note the error and driver details before changing another package.
- Test key functions after each driver change. Confirm that the network connects, audio plays, and the display works correctly. Test a printer or other essential accessory if you use one. Change one driver at a time, then restart if prompted and test the device again. This makes it easier to identify which update resolved an issue or caused a new one.
- Keep a clear record of working drivers. Save the new PC’s model information and note the chipset and other driver updates you installed. Future Windows updates and manufacturer driver packages may change device behavior. If an update causes a problem, use your notes to identify the affected component and previous package. This record also helps distinguish driver issues from unrelated transfer or application problems.
Pleasanton Computer Repair
Pleasanton Computer Repair can help when a Windows migration is interrupted by a drive that won’t open or files that have gone missing. If important data remains inaccessible on the old computer, data recovery may help retrieve it before you move on without those files. The team also handles virus removal if malware is affecting access to your computer or data. For straightforward transfers, the steps above may be all you need; recovery support is most relevant when the original files can’t be accessed or copied. Pleasanton Computer Repair serves customers in Pleasanton, Livermore, Dublin, San Ramon, Danville, Brentwood, Walnut Creek, and San Jose.
If your migration has left important files inaccessible, contact Pleasanton Computer Repair to discuss data recovery.
Make the New PC Your Starting Point
Use the move as a chance to decide what belongs on your next computer, rather than recreating every habit from the old one. Keep the apps and accounts you rely on, and leave behind clutter that no longer serves you. This simple reset can make the new device easier to use from the start.
If you’re preparing to migrate Windows to a new computer and an unexpected issue gets in the way, pause before deleting files or making repeated changes. Persistent pop-ups or unwanted programs, for example, may call for virus removal. Addressing the underlying problem can help you move forward with a clearer plan.
When you’d like help with a computer problem affecting your next step, contact Pleasanton Computer Repair. Take the move at a steady pace, and give yourself room to make the new computer work for you.
Frequently Asked Questions
What is transferred?
Windows Backup can move personal files and selected personalization settings, but it doesn’t recreate every detail of the old PC. Your Documents folder may transfer, for example, while a desktop program still needs to be installed separately. Before starting, make a short inventory of essential folders, account access, and apps. This helps you distinguish data you can copy from software or credentials you’ll need to set up independently.
How to migrate programs and apps to a new Windows PC?
Install the programs you rely on separately, then open each one to confirm it works on the new device. If you migrate Windows to a new computer, an exported Winget package list can help you identify apps to reinstall, but it doesn’t include the programs themselves. For specialized software, keep its installer and account details available, and test a critical work file before relying on the app.
What tools transfer data between Windows computers, and how much do they cost?
Windows Backup, File History, an external drive, and a shared network folder can each support different parts of a transfer. Winget can export and import a list of installed packages, not the apps themselves. Built-in Windows features and third-party migration tools differ in scope; third-party software pricing depends on the tool and license. Choose a method based on whether you need files, settings, or a broader system image.
How to transfer files with an external drive or network connection?
To migrate Windows to a new computer using an external drive, copy the folders you’ve chosen, connect the drive to the new PC, and copy them into the intended locations. For a network transfer, connect both PCs to the same network, enable discovery and file sharing, then open the shared folder in File Explorer. Keep the original folders until you’ve opened key files on the destination computer.
How to prepare and verify a Windows PC migration before wiping the old computer?
Keep the old PC intact until you’ve tested the data and programs you depend on. Open important documents, confirm email attachments are accessible, and check that representative contacts and calendar entries appear. Test any work-critical application with a project file. If a folder is missing or a file won’t open, you can still copy or export it from the original computer.
