
Starting fresh on a new Mac can be simpler than carrying over every old app and setting. To transfer data from an old Mac to a new Mac, use Migration Assistant to move documents, apps, user accounts, and some settings, or copy selected files manually. Migration Assistant does not replace the new Mac’s version of macOS.
It’s reasonable to want familiar files and apps ready to use without bringing along clutter or losing important information. The challenge is that moving an app does not always transfer every preference or piece of app data, or make it work exactly as before.
This guide explains how to choose between transferring everything and starting fresh, prepare both Macs, and use Migration Assistant or copy files manually. You’ll also learn what to expect with passwords and keychains, locally stored photos and music, apps, and app data, so you can plan the move with fewer surprises.
Key Takeaways
- Choose Migration Assistant to move accounts, documents, apps, and selected settings, or start fresh if you want a cleaner setup.
- Prepare both Macs before a transfer, and allow for a longer process when you have a large amount of data.
- Copy key folders manually when you want to bring over selected files without migrating everything.
- Plan to review passwords, keychains, and locally stored media after the move.
- Find out why some apps and their data may need separate attention during setup.
What is Migration Assistant on Mac?
Migration Assistant moves selected accounts and content from an old Mac or a Time Machine backup to a new Mac. Prepare the connection and decide what to transfer before you begin.
-
Prepare both Macs for migration
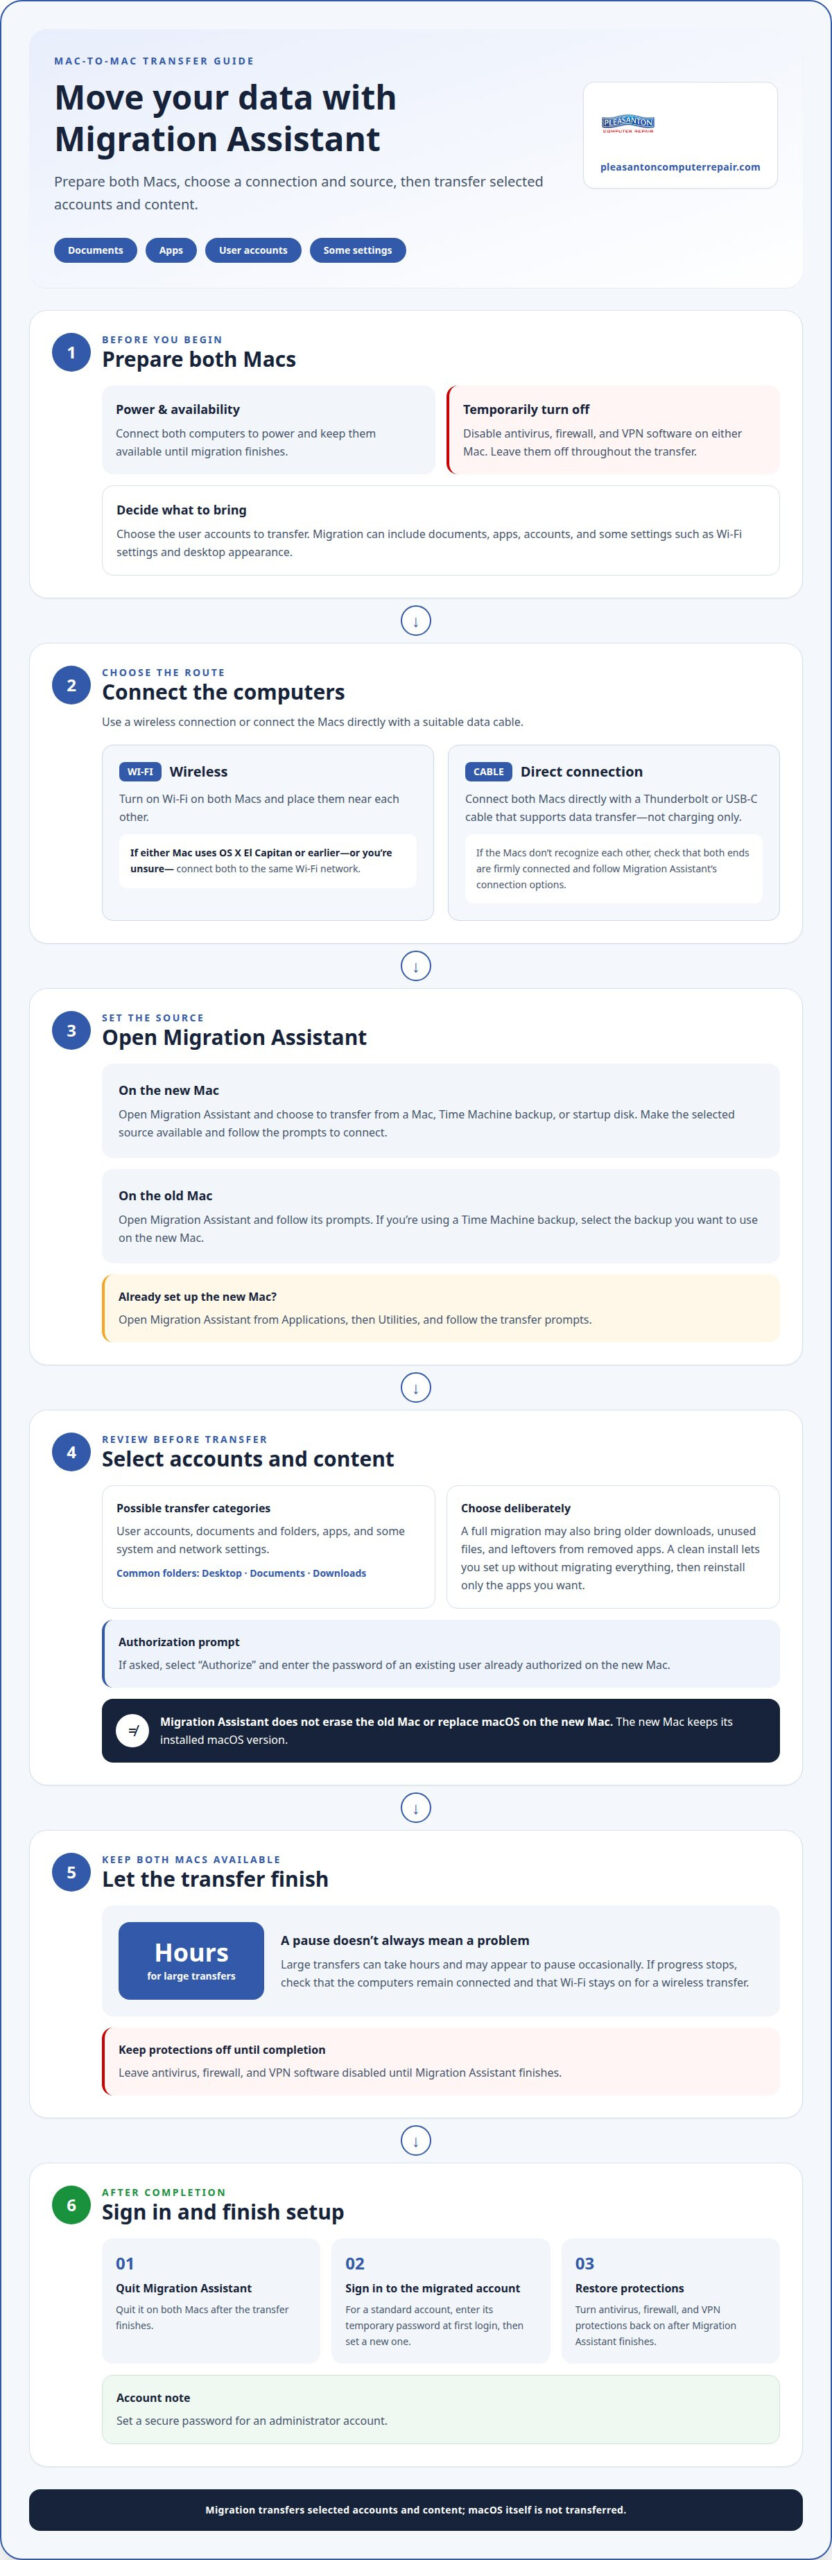
Connect both Macs to power, turn off antivirus, firewall, or VPN software on either computer, and leave those tools off until migration is complete. Keep both Macs available, and decide which user accounts to transfer. Migration Assistant can move documents, apps, accounts, and some settings, including Wi-Fi settings and desktop appearance. You can also migrate from a Time Machine backup instead of using the old Mac directly.
-
Choose a Wi-Fi or wired connection
For a wireless migration, turn on Wi-Fi on both Macs and place them near each other. If either Mac uses OS X El Capitan or earlier, or you’re unsure which version it uses, connect both Macs to the same Wi-Fi network. You can also connect the computers directly with a suitable data cable, then follow Migration Assistant’s prompts on both Macs.
-
Connect with a Thunderbolt or USB-C cable
To transfer data between Macs with a Thunderbolt or USB-C cable, connect the computers directly, open Migration Assistant on each, and follow the prompts to establish the transfer. Use a cable that supports data transfer, not one intended only for charging. If the Macs don’t recognize each other, check that both ends are firmly connected, then follow the connection options in Migration Assistant.
-
Check what migration changes on each Mac
Migration Assistant doesn’t erase information from the old Mac or replace macOS on the new one. It transfers selected accounts and content, while the new Mac keeps its installed macOS version. If prompted to authorize the migration with the password of an existing user already authorized on the new Mac, select “Authorize” and enter that account’s password before continuing.
-
Allow migration to finish
Start the transfer only when you can leave both Macs available until it finishes. Large transfers can take hours and may appear to pause occasionally, so don’t assume every pause means something has gone wrong. If progress stops, check that the computers are still connected and that Wi-Fi remains on for a wireless transfer. Keep antivirus, firewall, or VPN software disabled until Migration Assistant finishes.
Leave antivirus, firewall, or VPN software turned off on either Mac throughout the transfer, and turn those protections back on only after Migration Assistant finishes.
Opening Migration Assistant
Open Migration Assistant on both Macs, or make a Time Machine backup available as the source. Then choose what to transfer and follow the prompts to complete the setup.
-
Start a Mac-to-Mac transfer
On the new Mac, open Migration Assistant and choose the option to transfer from a Mac, Time Machine backup, or startup disk. Open Migration Assistant on the old Mac, then follow the prompts to connect the computers. Select the old Mac as the source on the new one, and enter any requested authorization details.
To transfer data from an old Mac to a new Mac with Migration Assistant, select the user accounts and other content you want to bring over. If prompted to authorize the migration with the password of an existing authorized user on the new Mac, click “Authorize” and enter that account’s password. Keep both computers available until the transfer finishes.
-
Review what Migration Assistant transfers
Review the transfer categories before continuing. Migration Assistant can move documents and folders, apps, user accounts, and some system and network settings. Standard folders can include Desktop, Documents, and Downloads. The tool doesn’t transfer macOS itself or change the macOS version installed on the new Mac.
Decide whether you want a full migration or a clean install. A full migration can bring over older downloads, unused files, and leftovers from removed apps, along with the items you actively use. A clean install lets you set up the Mac without migrating everything, then reinstall only the apps you want. Choose based on whether convenience or a tidier setup matters more.
-
Transfer from a Time Machine backup
Connect or make available the Time Machine backup that contains the old Mac’s data. On the new Mac, open Migration Assistant and choose the backup as the transfer source. Select the backup you want to use, then choose the accounts and categories to migrate. This is useful when you can’t connect the old Mac directly.
Review the backup contents on the selection screen before you start. Choose the right user account if the backup includes more than one. Migrating from a backup follows much the same process as transferring directly between Macs, and large transfers can take hours. Let the process finish before quitting Migration Assistant.
-
Use Migration Assistant after setup
If you’ve already set up the new Mac, open Migration Assistant from Applications, then Utilities. Choose the transfer option and follow the prompts to select the old Mac or a Time Machine backup. The new Mac’s existing user account may affect how migrated accounts are added, so review the account choices carefully.
After migration finishes, quit Migration Assistant on both Macs and sign in to the migrated account on the new Mac. Set a secure password for an administrator account. A standard account receives a temporary password, which you enter at first login before setting a new one. This lets you complete setup without starting over.
Manually copying files for a clean install
Choose manual copying when you want a fresh setup with only selected files from the old Mac. Move personal folders first, then open files on the new Mac to confirm the transfer is complete.
- Keep the old files available. Before copying, make sure the old Mac or a usable backup contains the files you need. Don’t erase or repurpose the old Mac while you’re still gathering documents, photos, or project folders. A clean install means setting up the new Mac without migrating the old account wholesale; it doesn’t mean deleting the source files.
- Choose a transfer method. Use an external storage device or a direct connection between Macs to move selected files. In Finder, locate folders such as Documents, Desktop, and Downloads on the old Mac, then copy the required items to the new Mac. For a project, copy its complete folder rather than selecting a few visible files that may depend on other items in that folder.
- Copy personal folders in a clear order. Start with Documents, then review Desktop and Downloads for anything worth keeping. Add other folders you created, such as work projects or scanned records. Avoid copying every old folder automatically. Downloads can contain installers and duplicates, so select the files you still use instead of moving the whole folder without review.
- Keep files organized on the new Mac. Put each copied folder somewhere easy to find, such as Documents or Pictures. Preserve useful folder names and subfolders. For example, keep a client project’s drafts, images, and final files together. If the new Mac already has a folder with the same name, compare the contents before combining them so you don’t overlook a newer version.
- Confirm the copies before relying on them. On the new Mac, open representative files from each transferred folder. Check a document, an image, and any project file you need for work. If a file won’t open, compare it with the original on the old Mac or in the backup. Keep the source available while you resolve missing or incomplete items.
- Leave system and app folders alone. Copying personal files manually is different from moving an entire macOS setup. Don’t drag system folders or the whole user Library over as a shortcut to recreate the old environment. Those locations can contain settings and support files that don’t behave like ordinary documents. Handle apps and app-specific data separately so you can decide what belongs in the clean setup.
Passwords, keychains, and media libraries
Check sensitive sign-ins and locally stored media after migration. Migration Assistant often transfers passwords and keychains, as well as locally stored photos, music, and media libraries.
- Test important passwords on the new Mac. After signing in to the migrated account, open the apps and services you rely on, such as email or a work account. Enter saved credentials where needed and confirm you can still sign in. If a password is missing, use the account’s normal recovery process rather than repeatedly guessing. Keep the old Mac available while you resolve access issues.
- Check keychain access separately. A keychain stores saved credentials used by Mac apps and services. Migration Assistant often transfers keychains, but confirm that useful logins and saved network details are accessible on the new Mac. If an app requests a password again, enter it directly in that app. Avoid deleting old keychain data while you’re still checking migrated accounts.
- Confirm where your media files are stored. Migration Assistant transfers photos, music, and media libraries when they’re stored locally on the old Mac. Open the relevant media app on the new Mac and look for familiar albums, playlists, or library content. If you used an external drive, check it separately: files stored there aren’t included in a transfer from the Mac’s internal storage.
- Open representative photos and music. Test a few items from different folders or albums instead of relying only on a library name appearing. For example, open a recent photo and play a saved music track. If an item is missing, locate its original file on the old Mac or connected storage before changing library settings. This helps distinguish a missing file from an app that needs to reconnect to its library.
- Revisit email accounts after migration. Migration Assistant can transfer email, but you might need to set up the account again in your email app to access it. Open the app on the new Mac and follow its account setup prompts if messages aren’t available. Keep the old Mac’s email accessible until you’ve confirmed that important messages and folders appear on the new computer.
- Keep the old Mac unchanged until checks are complete. Leave its accounts, keychains, and media libraries intact while confirming your new setup. Check the password manager or keychain, open key files, and review your photo and music libraries. If you used a Time Machine backup, keep it available too. Consider removing old content only after you’ve verified that the items you need work on the new Mac.
Transferring apps and app data
Migration Assistant can move apps, but app data and sign-ins may need separate attention. Treat each app as a small setup task, not just an icon to copy.
If the old Mac isn’t available, choose its Time Machine backup as the Migration Assistant source. Without a usable backup, files must first be recovered from the old Mac’s storage before you can move them to the new Mac.
- Make an app list before migrating. On the old Mac, note the apps you still use, such as a writing tool, browser, or accounting app. Mark which ones store projects locally and which use an online account. This list helps you separate essential apps from old utilities, trials, or software you no longer need.
- Decide whether to migrate or reinstall each app. Migration Assistant transfers apps, but a transferred app may still need an update, sign-in, or fresh setup on the new Mac. For a clean install, install only the apps on your current list. Use each app’s installer or account to restore it rather than copying only its icon from Applications.
- Identify where each app keeps its data. A project may live inside the app, in Documents, or in a connected cloud account. For example, check whether a photo editor’s catalog is stored locally or synced online. Use the app’s export or backup option when available, and include related project folders when copying files manually.
- Open migrated apps one at a time. Start with a frequently used app, sign in, and open a recent project or document. If the app requests a license, account password, or setup choice, follow its prompts. Test locally stored work before relying on cloud sync, since an app can open successfully while its projects remain elsewhere.
- Resolve missing data before removing the source. If an app opens without its expected files, check its recent-items list, project folder, and online account. Keep the old Mac or Time Machine backup available while confirming important work. Avoid deleting app-related files just because they look unfamiliar; some may support settings, extensions, or saved projects.
If an inaccessible Mac is blocking access to important files, get help with recovering those files.
Migration Assistant transfers documents, apps, user accounts, and settings from one Mac to another without deleting information from the old Mac or replacing macOS on the new one. Keep the source available while checking transferred apps and their data.
Pleasanton Computer Repair: Data Recovery
Pleasanton Computer Repair provides data recovery when an old Mac won’t start or important files can’t be accessed for migration. If Migration Assistant can’t use the old Mac and you don’t have a usable Time Machine backup, data recovery may help retrieve files from its storage. This is a practical next step before deciding which documents, photos, or project files to move to the new Mac.
Keep the old Mac and any available backups unchanged while you consider recovery. Avoid actions that could overwrite the files you’re trying to retrieve. Contact Pleasanton Computer Repair to discuss data recovery for your Mac.
Make Your New Mac Ready for What’s Next
A new Mac is a chance to shape a setup around the work you do now, not every old habit or file. Once you transfer data from an old Mac to a new Mac, give yourself time to settle in. Keep important source files accessible until your essential apps and daily tasks work as expected. This transition period can help you spot missing items before they disrupt a project or routine.
If the move is complicated by a damaged Mac display or a virus, Pleasanton Computer Repair also offers PC and Mac screen replacement and virus removal. Pleasanton Computer Repair also handles iPhone and iPad repairs for device problems beyond the Mac migration itself.
For help with your next step, contact Pleasanton Computer Repair. A careful setup now can make your new Mac feel like yours, with the files and tools you need close at hand.
Frequently Asked Questions
How to set up a new Mac: transfer everything or start fresh?
Transfer your account when you want familiar apps, files, and settings available together. Start fresh when you prefer to install only the apps you use and leave old downloads or unused items behind. For example, someone who needs an existing work setup may favor migration, while someone changing routines may prefer a clean install. You can also migrate selected user accounts instead of transferring every account.
What data and settings does Mac Migration Assistant transfer?
Mac Migration Assistant can move user accounts, apps, documents, folders, and some settings. Examples include files in Desktop, Documents, and Downloads, plus settings such as Wi-Fi and desktop appearance. It doesn’t transfer macOS or change the version installed on the new Mac. Locally stored photos, music, and media libraries can move too. Email may transfer, but the email app might require account setup before you can access it.
How long does transferring data to a new Mac take?
A large transfer between Macs can take hours, and Migration Assistant may appear to pause occasionally. The total time depends on how much information you’re moving and the transfer setup, so don’t plan other tasks around an assumed finish time. Keep both Macs available and connected until the completion message appears. If progress seems unchanged, check the connection before interrupting the migration.
What to do if Migration Assistant cannot find the old Mac?
Make sure Wi-Fi is on and place both Macs near each other for a wireless transfer. If either Mac uses OS X El Capitan or earlier, or you’re unsure which version it runs, connect both computers to the same Wi-Fi network. You can also try a direct wired connection or select a Time Machine backup as the source. Keep VPN, firewall, and antivirus software off during migration.
How to prepare an old Mac before transferring data?
Before starting, make sure the old Mac is available and that you can sign in to the account you plan to migrate. Decide which user accounts and files matter, and have a Time Machine backup ready as another possible source. Turn off antivirus, firewall, or VPN software until migration finishes. For a wireless transfer, enable Wi-Fi and keep the old Mac near the new one.
